Showing posts with label Regency Fashion. Show all posts

Friday, April 12, 2013

Speaking of shoes....

The American Duchess has been producing a growing array of historically inspired shoes for the costuming hordes for a while now. She has already produced the 'Pemberley' for the folks from our preferred time-period, a shoe with a small heel designed after shoes of the early Regency.  She made it in white leather, which is easily paintable... a canvas for your imagination.

The Pemberley
Here is an example of how you can take this simple white shoe, and elevate it to Regency bliss.

Click this image to see the blogpost detailing this project.
Now, the American Duchess has presented the newest Regency model called the 'Highbury'. This is a full Regency flat, and is something to covet.  For one... it is made of dyeable satin.  For two, there are four ribbon loops on each side of the inner shoe for ribbons, which can be laced through in myriad pleasing configurations.

The Highbury
As you can see, these are yet again, a wonderful canvas to play with.  Here is a blog post on a project working with a similar shoe:

Click this image to see the blogpost detailing this project.
Personally, I have always found the portraits of Regency ladies in white with a bright, jewel-toned pop of colour on their dainty feet, ribbons elegantly wound about their ankles to be visions of elegance.


Regency shoes were also intricately patterned and ornamented sometimes.  As seen by these examples, and by many more examples that can be dug up from around the interwebs:


A dye project is easy enough, as demonstrated by Miss Reeser (The American Duchess) in this helpful video.


However, like the project posted before, with the delicate painting, you can do just about anything, including even attempt silk-painting techniques using resist and dye to create an intricate design. I am not sure if this will work on dyeable satin, but it might be worth a try, maybe on some cheap shoes from David's Bridal or something first.

A modern silk-painting.
You can research more on silk painting through Dharma trading, where incidentally, you can find some fine voiles, cottons, silk gauze and dupioni silk for costumes for extremely reasonable prices if you are not afraid to dye fabrics.

The Highbury is on pre-order at present, which means, the model is proposed but not stocked. It must sell at least 100 pairs to be stocked. So I recommend you pre-order a pair as soon as possible so they can be made available to everyone.  They are at a decent discount, and you will also find some elegant accessories and shoe charms and clocked stockings for your costuming needs.

Wednesday, August 29, 2012

The 2012 retreat afterglow

A closeup of a man's frock coat, photo by Sara Palmer.
The 2012 ORS Regency Retreat was a resounding success. A completely different dynamic took hold this year as the retreat was held in the depth of summery August, and included lots of outdoor activities.  Organizer Stephanie Robertson was again extremely successful in blending together a succession of informative workshops, entertainments, activities and dining events.  From learning the art of making death-head buttons to writing regency letters with a quill, participants enjoyed a variety of period pursuits along with the welcoming society of their fellow participants. Presenters included the Lady of Portland House, who explained in detail the construction of period men's garments, to Author Mary Robinette Kowal, who taught writing letters with quill and ink, and Miss Kristen Behlings taught the workshop on creating a Regency hairstyle.

Miss Brehlings first sets the example.

The evening before, preparations are made for hair styling the next day.
Here is a delightful movie made up of some of the images captured from the four days at Newberg.  Below that, I have provided additional links to albums containing even more pictures.


More photos can be found here:
Mari Roll's Album (Facebook)

Friday, November 25, 2011

The 'Pemberley' Regency Shoe Available for Pre-Order!

Heads-up, Regency enthusiasts! American Duchess has released another model of period shoe and this time it's Regency. A beautiful Regency slipper complete with the side seams.  The shoe is from the early regency (1790-1810), with the pointed toe and a tiny, precious little heel.  At pre-sale price, they're only $80 and they're made of dyable white leather. Regular price is $95.

Pre-order today so she can continue to sell these shoes in her boutique! Every lady who does Regency costuming needs a pair of these. :) Gentlemen, this is a lovely Christmas gift idea.


Order yours here:


Friday, November 11, 2011

The Fabulous Fichu


Miss Jane Porter apparently wore a Fichu.
The Fichu, the chemisette—false sleeves... these are little fripperies that can change the look of a gown dramatically.  When you are into costuming, you can spend a lot of time sewing gowns and amassing a massive wardrobe of gowns simply because you want a variety of options. Sometimes having the right accessories can really change up looks that you already have.

The fichu comes in a variety of forms. Its purpose, as was the chemisette, was to fill in the neckline and to add a little je-ne-sais-quoi to your clothes.

Some pretty chemisettes.
A chemisette is a small 'dickie' of sorts; a sleeveless, or sometimes sleeved light-fabric blouselet that was put on before the gown as a neckline filler. Some were simple, some quite elaborate. A fichu serves a similar purpose, but is not an actual shirt. It's a piece of fabric wrapped around the neck and shoulders to cover and also highlight the decolletage of the wearer.

It is my experience, looking at the images of extant garments over the years, that items of Regency clothing, although similar in silhouette and style, were often constructed quite differently by different people. As people are today, they were also back in those days, imaginative, inventive and thrifty. They would use and reuse fabrics, and they would find ways to make their items particularly special.  Since the only thing that was mass produced were the fabrics, there’s no end to the variations in construction.


The Fichu is a perfect example of how the simple act of filling a neckline became a sort of competition of creativity, starting with the thickly ruched necklines of the early Regency to the froo-froo ruffled collars of the late Regency.  They are really indispensable necessities for any regency wardrobe, and lend a touch of authenticity that wearing just wearing a gown cannot achieve.

This is a different application of a fichu (left).
Tied 'round the neck, in front of the arms
and then around the waist. It is also a coloured fichu.
All you really need is your imagination, some very nice sheer fabrics and laces, and a couple of hours if your good in order to make some little accessories that will change your gown’s appearance completely.

Fichus were worn underneath the bodice and over the bodice. They varied in shape from a rectangle to a triangle.  Some covered the exposed neckline, while others only served to dress the existing neckline. Some were long, others were just slips of laced netting. In portraits, you see a variety of opacities in fabric, from the sheerest of the sheer, as delicate as dragonfly wings, to only slightly transparent, densely woven laces and embroidered nets.


The trick is to decide what looks you want for yourself, and then using the very basic shapes to construct those desired items.

For chemisettes;  there are a few patterns available where you can construct the basic garment, and then build upon it in lace and ruffles and such.  


Regency Neck Ruffs were often added on over chemisettes. Here are some tips on how to make a neck ruff:


Elizabethans were not the only ones who thought lace-ruffs
were the pinnacle of fashion.

Neck ruffs got more elaborate
as the late Regency wore on.
fashions were getting frillier and frillier.
As for the Fichu, it does not necessarily require a pattern to make one.  You can build them right on your dress-form or you can just use general measurements and cut them from there. Depending on how much you want full you want your ruching around your neckline, you can adjust the width of the fabric accordingly.  Your key measurement points are your shoulder width, and the distance between the back of your regency waistline and the front.  If you’re going to wear it on the outside of your gown, then you can make the ‘lapettes’ as long as you want them to be.  I’ve seen lots of images of older women with fichus on their shoulders with panels that hang down the front the full length of their dress. It’s very pretty.


I'm slightly crazy about the hat,
I must say.


Here are a few styles of Fichu I’ve seen in either fashion plates, costume mining in adaptations or portraits.  These drawings are open for interpretation, because again, these were made individually and to a person’s tastes. You can add and subtract from the basic shape to your heart’s delight.  Each image has a number. Below all the examples is a key with the very basic shaping of the chemisette drawn out on it. Keep in mind, I measured these based on my body--there is NO substitute for your OWN measurements. If you don't have a dress-form, then measure it on yourself.  And measure twice, cut ONCE. If you make something too short, you can always add lace edging, or ruffles--it's not a science, it's all about creativity.  If you use the foundation shapes and measurements, they sky is the limit in what you can do from there.

The simplest form of fichu. A rectangle,
ruched and then tucked.

Another rectangle, with a cut for the neck.

The tuckable triangle.

The triangle worn on the top of the gown.

With long 'lapettes' in front. I've seen these
made to the length of the dress.
This can be made, and set with drawstrings
to set the shape and gathering.

Recommended fabrics for Fichu 
(as a strong recommendation I suggest you try to stick to silk and cotton products) :
  • Cotton or silk netting.
  • Voile.
  • Batiste
  • Organdy (although it can be crunchy and stiff but it works wonders for ruffled collars)
  • Silk or cotton gauze
  • Cotton Lawn
(please pardon my hasty, and quite awful drawings!)

Monday, October 31, 2011

Achieving a proper fit with Regency stays.

There’s been a spate of discussion flying about the ORS for a little while now. Mostly it’s a discussion on how a set of Regency stays ought to fit, and how does one compensate for special issues, like more endowed ladies, or wide hips, etc.

The first misconception by anyone who’s accustomed to making corsets from other periods is that Regency stays should be shaped and fitted like a corset.  Of course they should fit you, and of course they should rest along your curves, but a Regency corset has really nothing at all to do at all with shaping a woman’s body. It’s one of the only style of corset in the long line of historical undergarments that is not at all designed to change the shape of a woman’s body. A woman’s ‘natural form’ was the aim (except with a little levitation). It is designed to hug the natural shape of her chest and torso. The Regency corset should wrap tightly around the torso, it should be stiffened with some boning or cording to keep it from crinkling up on you, and have good shoulder straps.

I say this often in posts about corsetry.  The boning in your corset has absolutely zilch to do with shaping or lifting. The only purpose of any type of boning or cording is to keep the fabric of your stays or corset taught.  Otherwise, without the boning, your fabric would fold and crinkle up on itself when you move around.  What gives you shape, and what creates support is the *cut* of your corset. So it’s important to make that distinction and not rely too much on boning to get you the results you want. It’s a supporting role, not the star. The pattern and cut is the star.

Hopefully my drawings don't look too terrible. :)
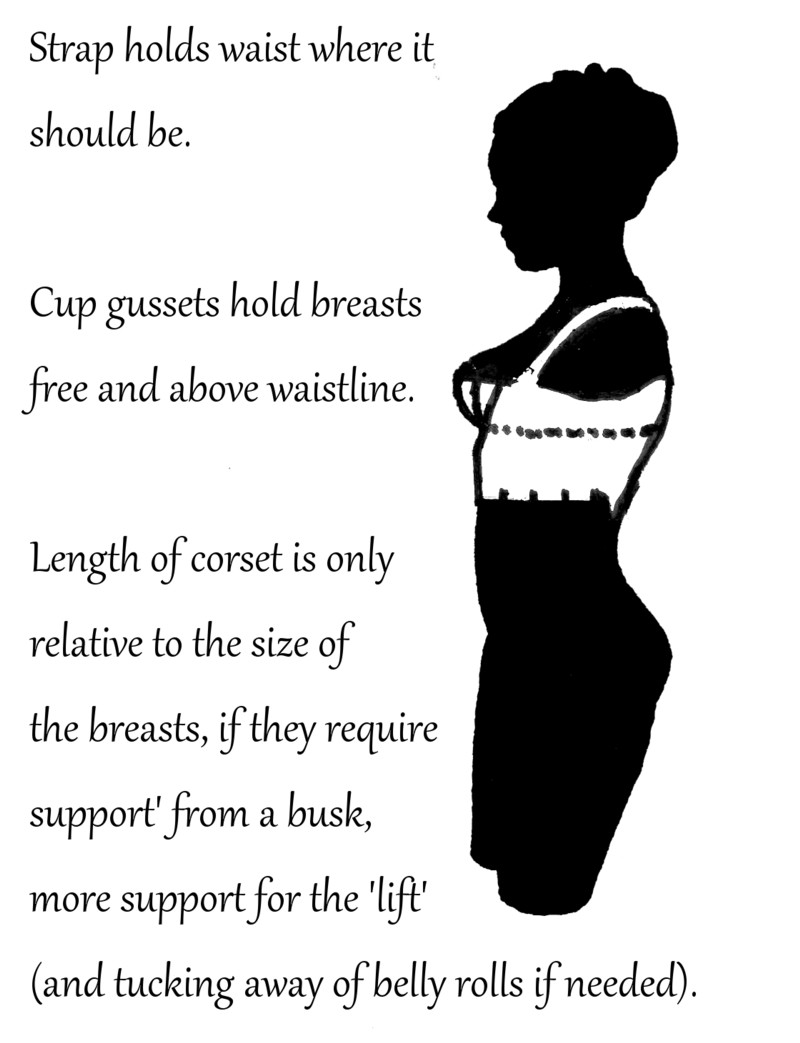
In all truth, the Regency corset is designed purely for lift.  That’s why there are so many styles of Regency corset (see an overview of the styles of Regency stays and underpinnings here)—because shape from the empire-waistline down, is largely irrelevant. Some women prefer long stays because they have a bit of a belly they want to control, and granted, if you have rather large breasts, you’re better off with a longer set of stays and a busk to divide and keep the center top of your stays against your chest.  Stays range from being no more than seven or eight inches long (almost to the traditional bra-dimensions with shorter straps) to hip-length. As long as your stays are doing what they were designed to do, it doesn't matter how much length is added, how much boning you stuff into the channels , how much cording or whatever else.

The NUMBER ONE thing you have to know and remind yourself when making your stays is that the empire waistline is KEY. You mess with that, you will have problems.  Your garments are designed to fit around this elevated waistline which runs directly under the base of your bust, and if you are not getting the proper lift, or your gussets are too low, your gown’s cut and placing will suffer.

There are three key points on a Regency set of stays that you must always address when constructing from a pattern or drafting your own;  1) a clear waistline, with the breasts securely held aloft above it. 2) Well measured shoulder straps. The length of your straps will determine where your waistline falls, remember that. If your straps are too long, your stays will drop down below the chest-line and mess with the fit of your gown. 3) The gussets—which are pretty important and should be designed to cup and hold the lower hemisphere of your breasts.

Gussets are key.  Some people believe that with larger breasts, you should lengthen your gussets, which means, deepen the cups, and place your breasts closer to where they naturally rest, right in the middle of your waistline.  Gussets can be somewhat lengthened if you do it intelligently, and you cut an arc in the cup before you cut the slits in for the gussets.  The trick really is to WIDEN your cups if you want to accommodate larger cup sizes. You should be building sideways, not up or down.  You are broadening the platter in which your bust should lay, instead of deepening it.

There are a couple of ways of giving that top binding of your cups the strength to cup the bosom. You can install a drawstring along the front of your stays to bring the edges of your ‘platter’ in, or you can bind it tightly so that it pulls the fabric in by itself. I’ve also seen some designs where the creator made cutouts for each breast rather than gusset slits, and then make gathered/ruched half-cups to fit into them wherein their bosom can nestle.

Now many women are concerned about ‘spillage’.  The rule of thumb is this, your gusset cups should not cover much more than the lower half/hemisphere of your breasts. The nipple should be just barely covered by the edge of your binding, or even half-covered.  The top half of your breasts should be pillowed in the cups.  What keeps them from falling out is the neckline of your shift.  The shift is an essential partner in the team that is your Regency underpinnings, and it acts like the top half of your bra.  You really should not wear one without the other.

    However you make your stays, if you keep in mind the above key points.
    1. Cut your gussets or cups to cup the lower half of your breasts, beginning above the empire waistline. 
    2. Your straps should be short and should hold your stays in place Protect the high-regency waistline 
    3. Use the shift’s drawstring neckline to retain the upper half of your breasts. 
    4. Use a busked corset if your breasts require dividing, or they are large enough to push the whole construct forward with just boning.


    Friday, June 3, 2011

    Costume for a Regency child.


    How can you not love the family chaos going on in this portrait?

    One of my favourite things is to see period family portraits. And not just formal sitting portraits, but ones where there are people unposed, doing ordinary things, the room in disarray or chaotic, children are running about. It’s so intimate to see a glimpse of Regency family life, and even better, to see the things children wore.


    The Regency child on the most part (at least from toddlerhood on) was generally dressed in a miniature version of the adult. They were expected to behave like adults in many ways, so it’s not much of a stretch that they would be outfitted like one. In babyhood boys and girls were dressed similarly in little regency frocks. Girls would graduate into their little high-waisted gowns and the boys got their skeleton suits sometime during toddlerhood.


    A few garments have survived the tests of time, and are now on display in a variety of museums around the world. Using those garments as examples, a number of people have been able to draft patterns from them or create new ones based on the extant garments.


    One of my favourite sets of children’s extant garments (with a pattern made from the garment itself) are the girl’s and boy’s outfits at the Danish Museum collection ‘Tidens Tøj'.

    Tidens Tøj' girl's gown.

    Tidens Tøj' boy's skeleton suit.

    Some wonderful, enterprising person drafted patterns from a number of the pieces and posted them on the website. One of the RSA Forum’s Danish members was kind enough to translate them. The translated patterns can be found here:


    View the original museum’s pages for:

    The skeleton suit:

    The adorable tiny gown:

    With the little regency gowns, there are lots of options, just as many as there are with adult gowns, style wise, and now there are several patterns to choose from.

    Some of the most popularly available patterns for girls are through Sense & Sensibility:
    This website sells a wonderful array of period goods, and their regency selection is absolutely wonderful because it includes patterns that are not readily sold in the US. There are several children’s options on this site (the adult options also offer patterns I’ve never seen sold in the US). They include more than one little girl’s dresses but also includes patterns for boys’ wear (skeleton suits & such).

    (click on the Regency button on the left and scroll down on the right).


    The Skeleton suit was the mainstay for many years during Georgian, Regency and even into the Victorian era for the little boys. I guess boys need romper wear no matter what age they grow up in. I personally think skeleton suits are ADORABLE. They were appropriate until about 10 or 12 (this is my estimation looking at portraits) and then the boys were put into littler versions of their father’s clothing. The trousers were either long to the ankle, or breech-length, just at the knees or slightly below them.


    Here is a picture of an RSA member’s child in his little skeleton suit made by his father. The proud dad’s photo essay on making this item can be viewed here:

    This is an interesting link of other children’s garments, including caps and bonnets.


    This is a wonderful sample of a young man’s clothing in the early regency that I found on DeviantArt.

    Here are lots of images for inspiration:

    (photo link provided by: http://kleidungum1800.blogspot.com/)


    One of the most famous period images of a young regency girl is 'Pinkie'.


    Another portrait has been paired with it--the portrait of Blue Boy.


    If you'll notice, the boy’s clothing fashions are more antiquated than the girl’s and there’s a good reason for that. Here’s an interesting history written about these portraits. The girl in the portrait was only 11 years old.