Showing posts with label Regency Costume. Show all posts

Friday, July 31, 2015

A fair & exhibit for all!


In January of 2016, the ORS is hosting a celebration of costume, from historical to fantasy.  The fair and exhibit will include costumes of all kinds; from reenactment wear, to cosplay and steampunk. It's over two days, there will be costume vendors and a costume exhibit and contest. All are welcome! So join us as a visitor or a participant. Application forms for vendors and exhibit submission forms will be posted soon on the ORS website. Visit www.orregency.org for details and keep checking in for updates. And don't forget to join the ORS Facebook group to join our lively discussions.

Saturday, August 2, 2014

Telling your Regency story with colour and fabric

Hello all! I regret neglecting this blog page for the NW chapter. I do have a good excuse though, and that is we're so busy with ORS events and the main website that we forget about this page sometimes. :) That *is* a good thing.  I digress! I have a little missive about fabric and colours for your regency delectation today. It may help you in constructing your regency wardrobe!

Building a regency wardrobe can be tricky, but only if you over think it. There are several cardinal rules you should stick to when you are assembling your wardrobe.

Slippy, shiny, froofy, mitchy-matchy and a tiny bit tacky.

1) Use natural fabrics. I cannot stress this enough! Stay away from poly blends or synthetics. The colours are not natural, and they are not period correct. They often reflect camera flashes and give off a shine that is unbecoming. Stick to silks, cottons, wools, linens and natural fibers. It’s also an advantage because these fabrics breathe better, and when you are layered up with all your underpinnings, it can get warm.

Particularly in silk, stay away from dupioni unless it is really smooth and not too slubby. Your best bet is shantung or taffeta. They did not use slubby silk, because it was considered cheap. You can probably get away with dupioni for hats and other accessories.

2) Choose tasteful trim. It's hard to define what tasteful is, but all you need to do is look at extant garments and fashion plates to understand what would be acceptable vs what is easy. Stay away from roses, stick with delicate patterns if you can find them.

3) Choose colours suited to the period.  There were bright colours, but they tended to have a muted value against some of the very bright, very pure colours of today. (See the bottom of this post for some colourway tools and ideas.

Jewel tones; bright and vibrant but not loud.

More lovely jewel tones.

Pastels that have just a dash of grey. Muted and subtle.

Subtle, muted pastels.

More muted, yet still vibrant tones.

Dusky earth tones.

More neutrals.
4) Don’t go matchy-matchy. No regency woman wanted to be one colour, or one pattern from head to toe. When picking fabrics for your outer garments and accessories, think neutrals, and think earthy tones. You can mix a brown hat with a slate blue redingote, and grey boots and nobody would blink an eye. Regency women did not in general, match their hats to their coats, and their dresses, and vice versa. Most of them could not afford to do that. They would make their garments, or buy and wear them until they had to repurpose them. 


Fabric was expensive. So to have matching items is perhaps a component of being rich, but even the rich were not compelled to make a hat that matched a particular dress. They might have coordinated a hat with a redingote, but not always. They mixed and matched their garments. The trick is to pick a colour and pattern story in your fabrics. To pick full neutrals for your hats and outwear, and even your accessories, and then be playful with your regular garments. Play with muted pastels (not modern pastels), earth tones, jewel tones, sparse and light patterns (roll and block prints), border prints, etc. Always in Regency, think DELICATE. Think SUBTLE. 


5) Stay away from Victorian busy rose prints. These are not regency. Large patterns were not common either. 


No

No

No
1820 - Yes
Yes.
Absolutely yes.

6) Stay away from Victorian lace with busy repeated patterns. If you want to make an overlay, use a sheer with a sparse embroidery design, or border whitework. There are even net sheers for windows you can find that will work fine, but they should not be solid pattern. 


NO!!!!
Pretty, but still a no.

A nice subtle dot, yes!

This would work.

7) Don't allow anyone persuade you NOT to use an 18th century style print for Regency. Again, fabric was expensive, and women very often reused the fabrics from their old gowns, their mother’s gowns and grandmother’s gowns. There are countless extant garments showing careful re-purposing of old-fashioned prints and fabrics by meticulous seamstresses. 


8) Do not hesitate to piece either. What does that mean? If you don’t have enough fabric to cut all your pieces in one large piece, you can add in little bits and bobs from your scraps to fill in. Regency women did it all the time. Precious, high-quality fabric was much valued. garments were lined in pieced scraps oftentimes, and gowns were decorated to hide the countless repairs and stains that inevitably happened. 


They were not the disposable world that we live in today. The rich often passed used garments down to servants and subordinates instead of throwing them away. Old, worn gowns were downgraded to morning gowns to be worn about the house when not visiting. 


9) Patterns were used for day (on the most part). Some jacquard style fabrics, silk stripes and elegant patterns can be gotten away with in regency evening wear. Regency evening wear was embellished with lace and trim—with few fully patterned fabrics. You do need to take care, however, in what you choose. Tastefulness is understated elegance, not fancy schmancy, especially during this period. 


In general, the patterned fabrics were used mostly for day gowns and morning gowns. See this Pinterest board for ideas of what kind of patterns and colours were used during that period. 


10) Any period prior to the time of mass-produced garments, there really are no absolutes (there ;aren't really any absolutes after that period either). People are imaginative; they have individual tastes,individual skills and ideas. We are creative now, they were creative then. What makes it authentic is the cut, the style, the technique, the fabrics, the colour story and the silhouette. 


Look at as many fashion plates as you can from the period, and decide your wardrobe from that. 


There are also really great tools to help you create a colour story palette to work with so when you pick fabrics, no matter how different they are from one another, their colours will complement each other. Dyes were natural, fabrics were never quite as white as modern whites are. So the brightness of a value was knocked down a bit. Keep that in mind when picking your colours. Stay away from Barbie pinks, and baby blues. Think of it this way; most colours in nature complement the other. Stick to natural tones and you can never go wrong. 

Some colour tools:
-https://kuler.adobe.com/create/color-wheel
-http://www.stylishhome.com/Design/Color-Palette-Maker
-Use a picture or a fashion plate to create a palette: http://www.pictaculous.com
-http://design-seeds.com/index.php/search. Pick one colour you like and then let the software find its best colour friends.

Friday, April 12, 2013

Speaking of shoes....

The American Duchess has been producing a growing array of historically inspired shoes for the costuming hordes for a while now. She has already produced the 'Pemberley' for the folks from our preferred time-period, a shoe with a small heel designed after shoes of the early Regency.  She made it in white leather, which is easily paintable... a canvas for your imagination.

The Pemberley
Here is an example of how you can take this simple white shoe, and elevate it to Regency bliss.

Click this image to see the blogpost detailing this project.
Now, the American Duchess has presented the newest Regency model called the 'Highbury'. This is a full Regency flat, and is something to covet.  For one... it is made of dyeable satin.  For two, there are four ribbon loops on each side of the inner shoe for ribbons, which can be laced through in myriad pleasing configurations.

The Highbury
As you can see, these are yet again, a wonderful canvas to play with.  Here is a blog post on a project working with a similar shoe:

Click this image to see the blogpost detailing this project.
Personally, I have always found the portraits of Regency ladies in white with a bright, jewel-toned pop of colour on their dainty feet, ribbons elegantly wound about their ankles to be visions of elegance.


Regency shoes were also intricately patterned and ornamented sometimes.  As seen by these examples, and by many more examples that can be dug up from around the interwebs:


A dye project is easy enough, as demonstrated by Miss Reeser (The American Duchess) in this helpful video.


However, like the project posted before, with the delicate painting, you can do just about anything, including even attempt silk-painting techniques using resist and dye to create an intricate design. I am not sure if this will work on dyeable satin, but it might be worth a try, maybe on some cheap shoes from David's Bridal or something first.

A modern silk-painting.
You can research more on silk painting through Dharma trading, where incidentally, you can find some fine voiles, cottons, silk gauze and dupioni silk for costumes for extremely reasonable prices if you are not afraid to dye fabrics.

The Highbury is on pre-order at present, which means, the model is proposed but not stocked. It must sell at least 100 pairs to be stocked. So I recommend you pre-order a pair as soon as possible so they can be made available to everyone.  They are at a decent discount, and you will also find some elegant accessories and shoe charms and clocked stockings for your costuming needs.

Friday, November 25, 2011

The 'Pemberley' Regency Shoe Available for Pre-Order!

Heads-up, Regency enthusiasts! American Duchess has released another model of period shoe and this time it's Regency. A beautiful Regency slipper complete with the side seams.  The shoe is from the early regency (1790-1810), with the pointed toe and a tiny, precious little heel.  At pre-sale price, they're only $80 and they're made of dyable white leather. Regular price is $95.

Pre-order today so she can continue to sell these shoes in her boutique! Every lady who does Regency costuming needs a pair of these. :) Gentlemen, this is a lovely Christmas gift idea.


Order yours here:


Monday, October 31, 2011

Achieving a proper fit with Regency stays.

There’s been a spate of discussion flying about the ORS for a little while now. Mostly it’s a discussion on how a set of Regency stays ought to fit, and how does one compensate for special issues, like more endowed ladies, or wide hips, etc.

The first misconception by anyone who’s accustomed to making corsets from other periods is that Regency stays should be shaped and fitted like a corset.  Of course they should fit you, and of course they should rest along your curves, but a Regency corset has really nothing at all to do at all with shaping a woman’s body. It’s one of the only style of corset in the long line of historical undergarments that is not at all designed to change the shape of a woman’s body. A woman’s ‘natural form’ was the aim (except with a little levitation). It is designed to hug the natural shape of her chest and torso. The Regency corset should wrap tightly around the torso, it should be stiffened with some boning or cording to keep it from crinkling up on you, and have good shoulder straps.

I say this often in posts about corsetry.  The boning in your corset has absolutely zilch to do with shaping or lifting. The only purpose of any type of boning or cording is to keep the fabric of your stays or corset taught.  Otherwise, without the boning, your fabric would fold and crinkle up on itself when you move around.  What gives you shape, and what creates support is the *cut* of your corset. So it’s important to make that distinction and not rely too much on boning to get you the results you want. It’s a supporting role, not the star. The pattern and cut is the star.

Hopefully my drawings don't look too terrible. :)
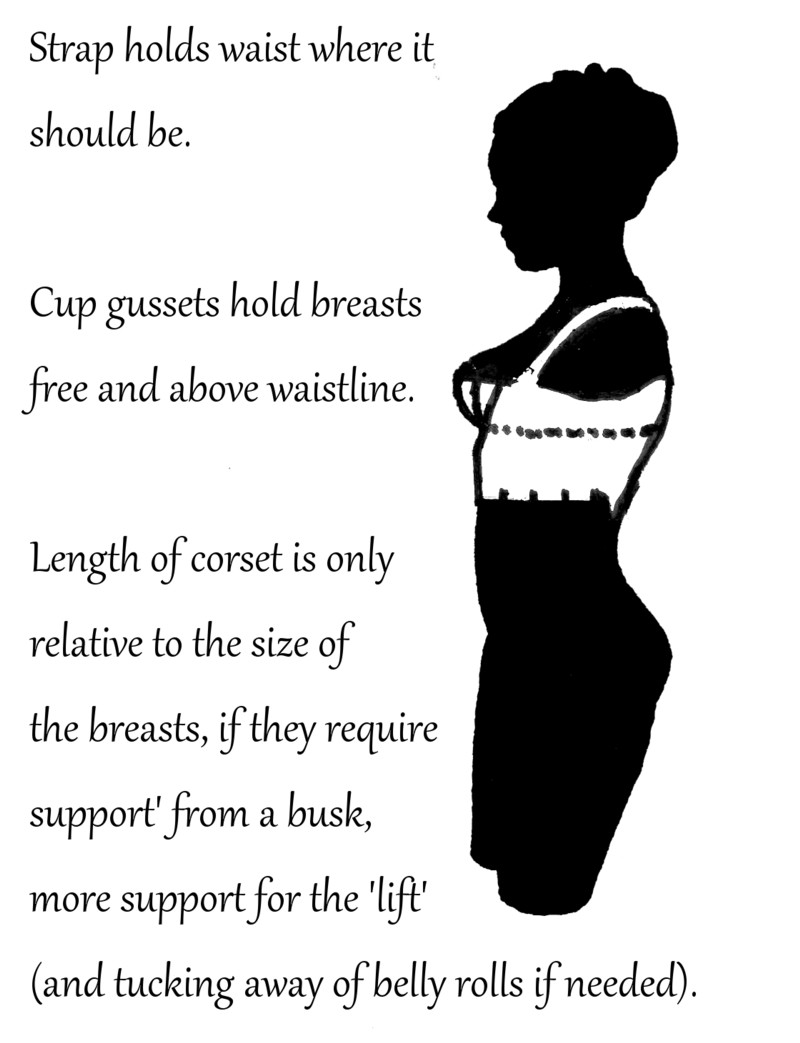
In all truth, the Regency corset is designed purely for lift.  That’s why there are so many styles of Regency corset (see an overview of the styles of Regency stays and underpinnings here)—because shape from the empire-waistline down, is largely irrelevant. Some women prefer long stays because they have a bit of a belly they want to control, and granted, if you have rather large breasts, you’re better off with a longer set of stays and a busk to divide and keep the center top of your stays against your chest.  Stays range from being no more than seven or eight inches long (almost to the traditional bra-dimensions with shorter straps) to hip-length. As long as your stays are doing what they were designed to do, it doesn't matter how much length is added, how much boning you stuff into the channels , how much cording or whatever else.

The NUMBER ONE thing you have to know and remind yourself when making your stays is that the empire waistline is KEY. You mess with that, you will have problems.  Your garments are designed to fit around this elevated waistline which runs directly under the base of your bust, and if you are not getting the proper lift, or your gussets are too low, your gown’s cut and placing will suffer.

There are three key points on a Regency set of stays that you must always address when constructing from a pattern or drafting your own;  1) a clear waistline, with the breasts securely held aloft above it. 2) Well measured shoulder straps. The length of your straps will determine where your waistline falls, remember that. If your straps are too long, your stays will drop down below the chest-line and mess with the fit of your gown. 3) The gussets—which are pretty important and should be designed to cup and hold the lower hemisphere of your breasts.

Gussets are key.  Some people believe that with larger breasts, you should lengthen your gussets, which means, deepen the cups, and place your breasts closer to where they naturally rest, right in the middle of your waistline.  Gussets can be somewhat lengthened if you do it intelligently, and you cut an arc in the cup before you cut the slits in for the gussets.  The trick really is to WIDEN your cups if you want to accommodate larger cup sizes. You should be building sideways, not up or down.  You are broadening the platter in which your bust should lay, instead of deepening it.

There are a couple of ways of giving that top binding of your cups the strength to cup the bosom. You can install a drawstring along the front of your stays to bring the edges of your ‘platter’ in, or you can bind it tightly so that it pulls the fabric in by itself. I’ve also seen some designs where the creator made cutouts for each breast rather than gusset slits, and then make gathered/ruched half-cups to fit into them wherein their bosom can nestle.

Now many women are concerned about ‘spillage’.  The rule of thumb is this, your gusset cups should not cover much more than the lower half/hemisphere of your breasts. The nipple should be just barely covered by the edge of your binding, or even half-covered.  The top half of your breasts should be pillowed in the cups.  What keeps them from falling out is the neckline of your shift.  The shift is an essential partner in the team that is your Regency underpinnings, and it acts like the top half of your bra.  You really should not wear one without the other.

    However you make your stays, if you keep in mind the above key points.
    1. Cut your gussets or cups to cup the lower half of your breasts, beginning above the empire waistline. 
    2. Your straps should be short and should hold your stays in place Protect the high-regency waistline 
    3. Use the shift’s drawstring neckline to retain the upper half of your breasts. 
    4. Use a busked corset if your breasts require dividing, or they are large enough to push the whole construct forward with just boning.


    Friday, May 27, 2011

    The Oregon Regency Society's First Regency Retreat

    Yes, you heard it, we're having our retreat! It's SO exciting to watch it come together and to start finalizing workshops and the registration packet. I put a preliminary notice on Facebook the day before yesterday and we already have a bit of interest. Stephanie Robertson has been the primary driving force behind this event, and has helped us acquire a venue to hold it for a price that makes it affordable for everyone. For less than $200, participants get nine meals, three nights lodging, a compendium of workshops and they get to play dress-up all the while! How can you beat that?

    We are happy to welcome not only Oregonians and local folks, but also people from out of state as well. We are willing to help with airport transportation and assisting in making sure you have the stuff you need for a comfortable stay. All you have to do is contact us.

    For a preview of what's in store for the retreat, click here. We will be adding more details as we finish wrapping up the odds and ends. Some things may be subject to change; to minor menu changes to some workshop modifications. In spite of that, we foresee a wonderful event with lots of great workshops to hone your skills in sewing, dancing, millinery, even baking!

    Click through and check it out. There are *ONLY* 30 available spots, so if you want to participate, you should contact the ORS for a registration packet.

    Tuesday, March 22, 2011

    Undressing the Regency Lady


    A Regency lady might have worn very light fabrics (old-fashioned muslin was more like voile or batiste is today) but she did wear a few layers to compensate. It was said that a regency lady’s gown should be of such light fabric, she should be able to fold it up and have it fit into her reticule. It is no surprise that in wintertime, the mode of the period caused many a Regency lady to succumb to pneumonia.

    Because of their penchant for light, airy fabrics, they had to make up for the opacity needed to make them presentable (except for those shocking merveilleuses; ladies known to wear very little beneath their very sheer gowns; thin muslin shift at best) with the undergarments.

    Les incroyables et les merveilleuses
    This period image is of an outlandish early-regency dandy offering money for ‘services’, mistaking this merveilleuse for a prostitute. She wards off his payment (with crossed fingers); she is dressed in the most daring of period fashions. Oh those French! Shocking!

    Here is another images that shows less of transparent fabrics and more of the widening of the neckline. The stays were meant to present the lady’s assets on the proverbial platter. The gowns in this image surely support this idea to its best adavtage.

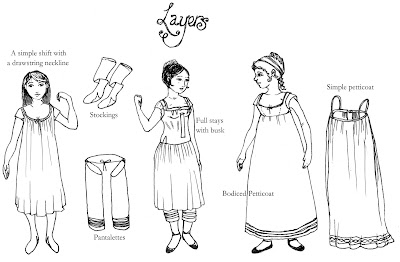
    Of course, on the most part ladies wore decent clothing. And here is a breakdown of what you might see if you stripped away the muslin gown.

    The Shift:
    This shift is the simplest of garments. It also acts as a dress-shield, keeping (on the most part) you from sweating on your outer layers. Shifts are about knee length to mid-calf-length.

    Patterns:
    http://www.kannikskorner.com/patwomen2.htm (Woman’s Shift 1790-1820)

    http://sensibility.com/patterns/regency-underthings-pattern/ (Sense & Sensibility Regency Underthings Pattern)

    The trickiest part of this garment is the gusseted sleeve. This youtube tutorial explains it wonderfully. This is a great garment for beginners to try.


    The neck should be adjustable with a drawstring.

    You see, the shift acts like the top half of the 'bra'. The regency stays will lift and cup the lady's assets, but the stays are shallow and they risk spillage if they are not contained. The shift's drawstring neck should gather an inch or two above the edge of the gussetted cups on the stays and rein-in those wild bosoms. The shift is very important and when dressing, one must spend some time making proper adjustments so that they are doing their job and not so tight that they risk closing in the neckline so much that they peep out from under the gown. See below.


    Stockings:
    Patterns: http://www.kannikskorner.com/patwomen2.htm (Scroll down to Stockings, Pockets and Mitts)

    Source for finished stockings; JAS Townsend.


    Pantalettes
    Pattern:
    http://www.mantua-maker.com/catalog.html (Scroll down to Regency section)

    Quoted from Dawn Luckham of the RSA board:

    "When pantaloons or pantalettes first began to be worn by adult women they were worn long enough to be seen. That was the whole point.

    C. Willett Cunnington writes in the “History of Underclothes” that they commonly extended down the leg to just below the calf, where rows of tucks and lace and pretty detail would be applied.

    Also from “History of Underclothes”: “From Lady Stanley’s letter of 1817 – ‘We were insulted by the presence of (Lady) Charlotte (Lindsay) in a green silk Spencer, green silk boots, and trowsers to the ankle much below the petticoat.’”

    As I mentioned before, pantalettes were generally just a couple of tubes of fine fabric (not usually wide legged – just straight tubes) fastened about the waist with a ribbon. They were not without their problems:
    And this funny little story written by a young lady comes from 1820.

    “ They are the ugliest things I ever saw: I will never put them on again. I dragged my dress in the dirt for fear someone might spy them. My first dimity pair with real Swiss lace is quite useless to me for I lost one leg and did not deem it proper to pick it up, and so walked off leaving it in the street behind me, and the lace had cost six shillings a yard. I saw that mean Mrs. Spring wearing it last week as a tucker….I hope there will be a short wearing of these horrid pantalets, they are too trying. Of course I must wear them for I cannot hold up my dress and show my stockings. No one does.”

    A footnote to this story indicates it comes from Mrs. Earle: 'Two Centuries of Costume in America'."

    Read more: http://regencysa.proboards.com/

    These are an interesting set of garments, and I personally am not brave enough to go commando by any means, so I tend to make myself full bloomers rather than these interesting garments. However, there are die-hards out there who are determined to be accurate (in spite of the prospect of a chilly bottom). They do make for a nice aesthetic, when a lady lifts up her layers of petticoats to reveal the cuffs of a nice pair of corded pantalettes. Very cute.

    The Stays:
    Once the lady has her undergarments on, she’ll put on her stays. Now I’ve depicted a set of full stays with a busk, but there were many styles and varieties of stays during that period, ranging from the tiny short stays to the one pictured above. Here is a detailed post on the regency stays and corsets that could help you decide which set is best suited for you. It also includes pattern links.

    Update: 8/26/2011: Here is a lovely little video stolen from 'Undressing the Historical Lady, performed by Miss Maggie Waterman. This is a perfect demonstration of what regency undergarments look like in person. You can learn more about Miss Waterman by clicking here: Undressing the Historical Lady. (Note, Miss Waterman's shift appears sleeveless, which is perfectly correct).


    The Bodiced Petticoat


    Though rarer than just plain stays, there was such thing as a petticoat undergown that had some boning in it that would provide support in place of a set of stays. This works best for ladies that are a B-cup or lower. I think with a C-cup or more, you should probably think about getting a set of stays. However, bodiced petticoats also served another purpose when not boned. They also could serve as a means to smooth out all the lumps and bumps of your undergarments and stays. There are lots of ways to make one of these. The Ravenrook’s Mode Bagatelle pattern provides a pattern for it—however you can easily take the pattern of your gown bodice and modify it to create a bodiced petticoat. Widen the neckline, of course, and make it sleeveless, add some soft (minmal) boning for structure, and you’re good to go.

    Instructions on how to make a bodiced petticoat from a gown pattern.

    Pattern:
    http://www.ravenrook.com/clothier/bagatelle/regency.jsp (Mode Bagatelle)

    I’ve also seen people add a skirt to their short stays to create a bodiced petticoat.

    Check out Katherine’s bodiced petticoat, shift and pantalettes here:
    http://www.koshka-the-cat.com/regency_underthings.html


    The high-waisted simple petticoat:


    In the movie below you see Katherine wearing this. It is a regency skirt on a waistband with two arm straps.

    The pattern for which you can either take from a commercial pattern or you can 'McGuyver' one using some creative thinking.

    You can follow the basic directions for a round-gown (see my personal post on Regency Drop-front/bib-front gowns) and sew it onto a waist-band you’ve sized to your empire waist. Add straps and voila. It will add volume and shape to your gowns, in addition to some lovely layers. I suggest 3.5 - 4 yards of fabric if not less. It should come to the line just above your ankles.

    Dressing:
    Katherine, costuming maven extraordinaire has made a delightful movie of how to put on a drop-front gown. What makes this video relevant here is that you can see her in her regency undergarments, including the high-waisted petticoat.


    There you have it. Your regency underthings explained (for ladies, of course). Next post by me will be the men’s underthings explained. :)

    Tuesday, March 8, 2011

    How sweet!

    The ORS's bonnet tutorials are much-viewed, and I discovered this little gem on YouTube this weekend, a young lady who is delightfully thrilled by her bonnet that she made using our tutorial. She's adorable, so I must feature her.

    Thursday, February 24, 2011

    Longing for Summer and all its diversions

    Good Day Ladies and Gentleman,

    While it is dreary and snowy, many a daydream has centered on the wonders and comforts of a warm summer's day. Others find the careful planning of the summer season to be a fine consolation to being kept in. What keeps me in high spirits is the careful planning and dreaming of a summer wardrobe and the accessories to accompany it.

    I have acquired over the holiday season a book that has become a great deal of joy to me as well as information. I received "English Fashions of the Nineteenth Century" by C. Willett Cunningham (no relation to our own Mrs. Cunningham).

    While this particular volume has many different styles and over 1000 illustrations of various fashions. The first chapter in particular is of interest to people enamored of the regency and federalist era.

    Here are a few peeks at the fashion plates from this wonderful book:


    I hope that these are inspiration for hats and fashions for the delights of picnics, promenades, carriage rides and any number of pleasurable country diversions.

    Your Humble Servant,
    Mrs. N. Azevedo