Wednesday, June 16, 2010

An Overview of Regency Stays/Corsets

I know, it’s very soon to post a new topic, but I was sketching today, and found myself doing a little study of Regency stays--thinking about perhaps making myself a new set just for riding. So this is my new post. ;)

I gave away my customized transitional stays (click here to see photo journal of the project) to my dear friend because frankly, it fits her better. So did my 2008 Winter Ballgown… that brat.

I digress… So I started thinking about making a new set, and started looking at patterns, and I realized I hadn't done a good comprehensive post about Regency corsetry at all, and it was due time.

The Regency stay is unique in historical corsetry because it is one of the very few periods where the corset was designed for something other than shaping the torso/waist. The Regency corset was a lifting device; and it was designed to present a lady’s assets on a proverbial platter. The gown was supposed to fall in a long, columnar line below the empire waistline.

In my few years of pursuing projects in the period costume, I've learned a lot about making Regency pieces, so please read these tips if you haven't done any corsetry yet:

An important truth you must know in corset and stay-making… boning is not meant to hold you. All boning is meant to do is to keep the fabric of the garment taut and to prevent it folding or wrinkling. The *cut* of the corset is where the shape comes from…. And in the case of the regency corset, the gusseting is key. Gussets are not fun to do, but they are crucial in shaping your ‘platter’ to suit your assets, and in setting the long stays on your hips so that the rest of the taught fabric will continue to hold you while you go about your day.


How to sew a gusset (tips on a post-it).


A busk is a flat, wooden stick that helps to keep the front of a corset straight, tight, and keeps your gusset cups upright and separated. It was sometimes known that gentlemen would carve and smoothen a busk, and etch his nam into it for their favourite lady so she could wear his handiwork close to her heart. How romantic. :) The busk slides into a narrow, long pocket sewn into the front of your stay.


If a regency corset is made correctly to fit its wearer, you should never be so tightly trussed up that you are uncomfortable; as you would be in a corset from another period. A Regency corset should act as a really great supporting miracle-bra; and for some lucky ladies, that is all they might need. A miracle bra.

So, for those of us who cannot get away with just using a miracle bra to acheive the desired Regency silhouette... here is a breakdown of the period's corsets, some sample images and some pattern recommendations. If you know of good patterns, not mentioned here, please feel free to add links in your comments.

The three general categories of Regency stays:

* The Short Stays *

The short stay is in essence, the miracle bra of the regency period. It is small, and reasonably comfortable.
Best suited for these body types:
  • Smaller cup sizes. Not recommended for anyone above a C-cup; despite the option of going to a D on most patterns. Large breasts often push the front-closure forward, and the lack of busk or length causes the boning to angle into your chest, it can be uncomfortable, and look less than flattering. Recommend transitional or long stays for larger cup sizes.
  • Smaller body sizes. I don't recommend this corset if you are a plus-size fit. The boning just is not compatible with any padding on the tummy.
Difficulty:
Easy to make as stays and corsets go. It was actually my FIRST costume project for the ORS. I was daunted at first, but once I got three layers together, I was very proud of myself to find how nicely everything sort of fell together. A beginner could pull this one off, with determination.
Recommended patterns for short stays:
Boning:
  • Minimal boning required
  • Boning recommendation: zip ties, spiral steel.

Hovering between short and transition stay is the Kyoto Museum's wrap-around brassiere. This is an unusual design, and there is a pattern available for you to try (link provided above).

Kyoto Museum Regency Brassiere


* The Transitional Stays *
Best suited for these body types:
  • Cup size: Medium to larger cup-sizes (C & D+)
  • Body size: Small, medium to thicker body sizes. If you are a bit rubenesque, you might find that the boning on the front might cut a bit into your belly when you sit, and the belly might push the boning up when you sit as well as well, further pronouncing your ‘platter’.
Difficulty:
Definitely more involved a project, mostly because most transitional stays have tabs or are wraparound projects. A beginner could pull this one off, with determination and care, but it’s definitely a project recommended for intermediate sewers.
Recommended patterns for transition stays:
Boning:
  • Minimal to moderate boning, depending on your preferences.
  • Boning recommendation: cording, caning, zip ties or spiral steel.


The Daisy wrap-around stays
* The Full Stays with Busk *


Best suited for these body types:
  • Cup size: Pretty much any-sized cup with the right gusset-work and shaping.
  • Body size: From thin to curvy this corset suits them all. The busk is a wonder for the fuller-figured, more-endowed woman. I recommend this corset to all. It’s not half as complicated to make as you think, however you can challenge yourself with it by doing some intricate cording to make it really a work of art. Here is a helpful tutorial on how to do cording from Jennie LaFleur.


Difficulty:Definitely more involved a project, but easier than the wrap-arounds and the tabbed transitionals. A beginner could pull this one off. Seriously. An advanced seamstress could make it amazing.
Recommended patterns for Corset:

Boning:
  • Minimal to extensive boning/cording, depending on your preferences.
  • Boning recommendation: cording, caning, zip ties, light steel or spiral steel.
The Shift

The shift plays a crucial role in tandem with any of the above undergarments. Your gusset cups will lift and cup your assets, however the shift's drawstring neckline is meant to capture and contain the upper half of your breasts; and act as a friend once said as the 'top half of the bra' so to speak. So when you are looking for shift patterns, be sure to pick one that has a drawstring neckline.

Achieving a Proper Fit

In order to fit your corset or stays well, you should probably read this post on fitting before you begin construction of your stays. It will help you make sure that the stays you choose are helping you achieve the proper silhouette.

I hope this little post will help you decide what works best for you, and also inspires you to make your own stays, they are not as difficult as you imagine, and you can customize them to be something extraordinary if you want. Good luck, leave comments and don't hesitate to ask questions... I'd be happy to help. ;)

Friday, June 4, 2010

Let's talk habits

Two of our most beloved ORS members are organizing a wonderful new event. A Fox Hunt!

Naturally, as the ad says, we will be hunting faux-foxes, sans horses and baying hounds—but we WILL be hopefully all trussed up in our finest riding habits as we run about seeking out those sly little fellows hiding in the shrubbery. So I thought a post on the Regency Riding Habit to be much called-for.

Personally, being an avid Horsewoman since I was four, this project has caught my interest. I’ve ridden sidesaddle in the past, however my habit was more Victorian in style than Regency. I have been simply DYING to make a regency riding habit, despite my horse not quite being trained enough to wear a side-saddle… however, this isn’t going to stop me from moving forward on this project, and I have been looking at a number of fashion plates to get myself motivated. There are TONS of blogs out there featuring a variety of habits in a compendium of colours… so I’ll let you do your own picture searches. Right now, I’ m past pictures and am now well into the patterns and research. HOWEVER, as the mainstay of regency research given to us by the irascible Cathy, who taught me SO much with her invaluable website, I offer you this single link. (Pay some attention to the hats too!)

Inspiration:

Here is a link to an extant garment, shared by Dawn Luckham, costumer extraordinaire!

Dawn wrote: "Extant habit in linen or cotton (Holland is a fine quality linen). Note the light colour!"

Meg Andrews' Hot Climate Riding habit.
Click here for a detail


Kyoto Costume Institute's Extant Habit
Estimated 1810.(detail here)
This habit has a longer waist than the others depicted here today, but it is a perfectly lovely example of a period riding habit.  The buttons are adorable.  Here is a modern interpretation of this garment:


Patterns of habits:

There are very few patterns out there to work with… here’s what I found; The Rocking Horse Farms pattern (scroll down the page to find the pattern) also comes with a shirt. I have no reviews of it, but as RHF patterns go, they are usually decently drafted and easy to follow.


Reconstructing History’s Habit (ostensibly based on the pattern by Janet Arnold)… I’ve heard mixed reviews of RH patterns… they are certainly not a beginner’s pattern.

Janet Arnold’s Patterns of Fashion 1 book contains the a nice habit, in addition to a number of other amazing Regency patterns, from bib-front gowns to half-robes and a robe. Definitely worth the price of the book… trust me.


Habit projects:

Now, I’ve been following Katherine; a young lady who is almost a legend in the costuming world around here, for quite a while. She is amazing. Her website is addictive, so before you click through, finish up reading this post, because you’ll forget all about it once you start browsing her photo-essays of her various costume projects. Katherine tackled a number of Regency pieces. One of these includes her Regency riding habit. Her project photos are enlightening—and explain a lot about construction.

What Katherine shows us is that she can take a pattern (Janet Arnold’s) and piece it out to customize the design. If you look at her construction page, you can get an idea how she constructed her pieces. Her inventiveness for the habit shirt is also wonderful:

That girl is a wonder; and she hand-stitches EVERYTHING. ::blargh::

I think the primary difference between a habit and a spencer is that you are supposed to wear the spencer over your clothing. A riding habit is your gown in essence. Many women used the riding habit as traveling clothing as well. The habit would be made of a lighter material than the spencer. A linen, or very light wool, or heavier cotton, perhaps. A nice jewel or earth-tone was appropriate.

The riding habit comes in two primary pieces (three if you count the shirt). The first piece is pretty much a short spencer—add a nice peplum and you’re good to go. It doesn’t take too much to modify your collar and front to your preference. Scanning the variety of fashion plates out there can inspire your design. Riding habits often had a distinctive military look, or sometimes, they looked like tiny versions of the gentlemen’s frock coat.

I look at these patterns and I see a lot of similarities from a riding habit and the Ravenrook/Mode Bagatelle Spencer pattern for the spencer (see views G for the peplum and H for the collar and the rest)


You can easily take this pattern and turn it into a viable riding habit using lighter fabrics, and taking in the seam allowance a tiny bit, so that it is closer-fitted.

Taking that pattern for the spencer, you can create something quite authentic looking; and using the skirts from View C, you can create the trained skirts (or untrained if you don’t want a train) that you need for your habit. Using the bodiced petticoat bodice (view A), you can use the back and side pieces to create the little bodice that holds the skirt up; trimming the front part off just shy of under the arms, and making sure to cut your back on a fold so it's one contiguous piece. (See Katherine’s habit skirt on her page linked above for a better idea, or my drawing above as well).


If you own the Sense and Sensibility Pattern for a spencer, and you are inventive, you can surely use that pattern to construct your habit jacket with it. You’d have to probably work in the peplum yourself, but it will provide a good framework to begin.

Sense & Sensibility's Chemisette pattern (as well as LMB's chemisette in their pattern package) would work extremely well for a riding shirt (although they both lack sleeves). But like Katherine, you can be inventive; because the white ruffled cuff inside your jacket sleeves would be very pretty. Depending on your collar, you will want to fill in your neckline, and even apply a small cravat or some ruffles to the front.

Finally, the Burnley and Trowbridge pattern for a spencer is very habit-like and it has a darling peplum.


I am going to attempt to hold a workshop before September to help people construct these delightful garments, but in the meantime, let these images be your inspiration to create a riding habit you can feel elegant in. :)

What to wear underneath

There is also the question of what would be the appropriate underthings for a habit.  It depends on whether or not you are actually going to ride a horse sidesaddle or if you are doing it for the simple sake of costuming.  In the case of costuming, the standard undergarments will suffice; although there are some little period breeches (featured on Koshka the Cat's habit post) that are modeled after men's breeches that women were known to wear. But a pair of pantaloons or pantalettes will do if you aren't comfortable in just a shift and petticoat.  And stockings of course.

For the actual rider, I do not recommend you wear a petticoat unless you have made it with lots of volume, you need a lot of freedom of movement under those skirts. A shift and your corset over a pair of riding leggings or jodhpurs would be your best bet, although I have seen women wearing standard riding breeches underneath their habit skirts (sometimes full seat breeches for stickability) with only one tall boot on their left leg and a short boot on the right, which is a standard sidesaddle practice.

Regency Ladies' Riding Boots

Depending on your commitment to authenticity, your selection of appropriate boots is fairly broad.  If you can find a pair of all-leather lace-up standard paddock boots, you're in luck. Ariat makes nice paddock boots, and they're specifically designed for riding. I'd recommend these for people who actually intend on riding in their Regency habits.  ((See my post on Regency Sidesaddle Riding)) These boots look the part, and serve a practical purpose. Here is a sample of actual riding paddock boots: Click Here. 

If you're not too concerned with having actual riding boots, but you want something that is authentic with your habit and also with other Regency day-wear, you should get these: Click Here.

If you're looking for something that looks the part, but doesn't cost too much, and doesn't really need to be too practical, a pair of good lace-up Jazz boots look the part. Sample Here: Click Here. More samples: Click Here. They range at about $30 - $40

_____________________________________________________________________ 

Update! Look at this reproduction piece I stumbled on via another period blog; it includes photos of a garment for sale--here is the link for the sale page, but since sales are temporary by nature, I wasn't confident that this link would remain active forever, so I sniped the pics from the site and made a little collage so that if the link breaks, you can still see this beautiful garment.


The sale caption reads: c. 1999 repro 1810 Deep Navy Cashmere Wool Felt Empire Trained Equestrian Riding Gown and Jacket (Riding Habit) from Jane Austen's Mansfield Park 1999 film version! COA! Every once in a while I'm able to get my hands on some fabulous period reproduction pieces that are beautiful enough to compare to the original period gowns. This one captivates your heart! You will never find another quite so realistic. The jumper gown can be worn buttoned up at the sides as you see, or just unbutton to wear straight. The jacket has violet-blue velvet collar, cuffs and buttons. The wool feels like cashmere. Wonderful! Near mint condition. Purchased directly from the production company and comes with COA that calls it "Andrea's Vest and Jumper". I'm not sure who Andrea was in the flick, but in this instance it's all about the costume itself, not the actress.

Thursday, April 1, 2010

Outfitting the Regency Man


In creating a Regency wardrobe for a gentleman, the first thing you need to consider is what walk of life does your Regency persona represent? The Regency gentleman, as you know from the many books and adaptations, wears a broad range of costume; if he’s in the military—does he wear a uniform? If so, which one? Army, Navy, British, French, New World…? War of 1812 or Napoleon?


If he is a Gentleman, what is his rank in life? Is he a gentleman farmer? Is he an aristocrat? There are details that will create the difference; from choice of materials to accessories… your ‘persona’ will be affected by what you choose to wear. I recommend you look at various examples of Regency costume, and decide which suits you best, then take a moment to study the examples that are available to take in the details that make your choice different from others.

However, I am going to describe the basic items that compose the costume of a regular regency gentleman given the time of day and his choice of activity—and detail the details that make a costume correct for the Regency period.

The regency male silhouette was meant to showcase the male shape; the broadness of shoulder, the breadth of chest, the narrowness of waist and the shape of the calf muscles. They sometimes wore calf-padding to enhance their legs. Seriously. So their clothing reflects this; tight trousers, slightly gathered sleeve tops for a little volume, huge, stiff collars, cravats that puff out the chest; swaggery tails and frocks; it’s all very roostery.

Outerwear:
You’re a regency gentleman about to hop on your baroque horse and take a ride from London to visit your family in the north. You’re in for a long ride; but as with the regency style, you would not get on your horse looking inelegant.


The greatcoat or ‘garrick’ ~ an elegant yet practical garment, the stacked shoulder capes give the wearer a broad presence. There is a vent that splits the back for riding. These are made usually of wool, sometimes linen and even leather. Regency gentlemen also wore basic cloak/capes, sometimes with a shoulder cape or two attached.

Some pattern suggestions:
Hats:
-For riding/hunting/outdoorsy things: A broad-brimmed hat to shield him from the sun. Sometimes straw, sometimes black felt with a broad brim.


Website suggestion to start:

  • A slouch hat (this is the closest thing I could find for a wide-brimmed style hat, but the top isn't quite correct)
-For larking about in town: You need a topper. The regency topper (depending on what part of the regency) either had a slight curve to the ‘pipe’ portion, and the brim curled upwards on the sides or they had a straight, straightened 'pipe' with the brim curled up at the sides. They were in a variety of black, brown and other deep earthy tones. The early regency hat was slightly tapered straight hat with a wider brim with less curl on it like the one pictured below.
Some website suggestions:
-For arriving at a ball, or if you are in uniform: Tricorns (early regency), bicorns (or cocked hat).
A website suggestion to start:


Shoes:
-Brown top or riding boots (daywear, riding)~ never cheap but always worth it, a good pair of tall English riding boots, especially with a brown top, are always elegant and very useful for daywear of any kind; worn with breeches or long trousers alike. Also, Hussar boots with a tassel, knee length, mid-calf-length… there is a wide range of acceptable boots for daywear and riding. A low heel is crucial. Regency men did not wear heels like their fathers and grandfathers did.

Website suggestions:
-Slippers: Flats, soft and refined, the Regency man wore a pair of slipper shoes over stockings when dressed more formally. There were mule slippers that were worn in the home during casual times when at home in his banyan by the fire. But he wore fine slippers for evenings and special events. Believe it or not, regular soft leather black classic dance slippers are perfect for this application.
Some suggested sites:

A traditional 'court shoe' which can be patent or even velvet.

The Wardrobe Basics:
-The cutaway frock coat ~ Depending on when in the Regency period, the shape of the cutaway will vary. From a subtle, more 18th century curve in the front panels to the later-regency straight cutaway style with defined tails, a frock coat is a mark of manly elegance. A variety of materials were appropriate; from cottons, linen to light wools and even silk, the daywear frock coat was often in earthy tones of green, browns and the coveted blue. A gentleman wore this all day; it was considered a state of ‘undress’ to not wear one’s frock coat and have one’s shirt sleeves exposed. One somewhat important point for historic accuracy in frock coats, the Regency frock coat does *not* have a seam circling the waist. The pieces are long and whole from neck to tails… only during the early Victorian period do the waist seams appear. Frock coats had very high, often boned or stiffened collars, wide lapels and a short front so the coloured waistcoat could be revealed underneath. The armseyes are set far in from where they are today and the sleeves are supposed to be tailored to fit the arm quite snugly. There should be a split in the tails for riding and a pleat on each side of the split. Some frock coats sport pockets on each side of the rear tail. There are NO POINTS on the front of the regency frock coat. The bottom of the front should either be a straight line, a curved line, or a gothic arch when the front is closed. Evening frock coats were usually black.

Some suggested patterns:
-Breeches: The fall-front/broadfall breech or trouser ~ Regency men wore their pants tight. If it was the calf-length breech or the full length trouser, most breeches were cut on the bias so there was some stretch, and they hugged the legs very tightly. There should be a drop-front panel fastener on the front, although there were some variations to the closures. The back had a rather pouffy gather on the derriere, with a drawstring tightening at the back (the behind should never be seen since it’s always covered by tails). If your breeches are loose and creasing on the leg, they’re too loose. Evening wear required primarily black or white and sometimes a soft tan breeches of natural fabrics. Do not pick anything too shiny. Daywear includes fawn or tan, brown or a variety of other deep tones. A pair of suspenders might be required to hold those pants up… but they will be hidden beneath the waistcoat.
Pattern suggestions:
-The Waistcoat: Sometimes worn in double layers to display more of an eye-pop of colour, it was here where the Regency man was allowed to play with pattern and colour the most. Jaquard, damask, silk, the waistcoat, though most of it was hidden beneath the frock coat, the colour popped along the edges of the front lapel and collar and from beneath the bottom front panels of the frock coat. If they had a print, it was usually tone on tone, or very small prints and designs, elegant roll prints, or a small stripe. For balls and formal events, the waistcoat was often white. Regency period is all about elegant simplicity, no huge flowery prints please or anything super-shiny! And remember, a regency waistcoat is short, it reaches the waist, it is not long like the 18th century ones that hang to the hips. There are not points, it's a straight line across the front with a sparse, sort of crew collar.

Pattern Suggestions:
-The Cravat: A long, crisp, and fairly wide rectangle of simple cotton or silk fabric, it was ruched/crunched down to fit the collar, and tied ‘round the neck and then into a variety of knot-styles in the front. This cravat, generally white, but also seen in various colours in paintings, etc, with the standing shirt collar is the essence of the regency man. We recommend you make a cravat from at least two and a half yards of 9-10" wide white crisp cotton or silk.

  • Reconstructing History's "Complete Regency Gentleman's Pattern Package" *Note about Reconstructing History patterns; general consensus of RH pattern reviews is that they are not for beginners--and the instructions are sometimes confusing, please keep that in mind if you've never sewn tailored items before, and we also recommend that you create a muslin mockup of each tailored item first before cutting into the expensive wools, etc.
Undergarments:

-The Shirt: Any standard ‘pirate shirt’ would do, as long as it’s not too 18th century froofy and frilly. A simple stand-up collar, lace closure in front, which will be hidden by the cravat, either simple flared or wide cuffed sleeves that peek out from underneath the frockcoat cuffs.
Pattern suggestions to start:
-Stockings: These stockings are long, and go to the knee or over. They were of a variety of colours for day use, and normally white or ivory for evening.

A good source for stockings:

-Corset: Some men wore corsets, yes, to promote the narrowness of waist and width of shoulders.

Accessories:
  • A simple watch and ribbon fob to hang from the waist of your breeches.
  • A cane
  • White gloves for dancing.
  • Some nice muttony sideburns.
  • Elegant manners.
What of the hair? Comb it forward towards your face. It’s rakish and handsome.

There are lots of shortcuts and alternatives that are not so noticeable. Stretchy pirate pants... modify an existing tailcoat... a vest with a standing collar. They can still be used and look quite authentic. :) Go to the Oregon Regency Society's website and check out their resources page for more ideas and patterns.
Do you know of great patterns? Do you have resources or information to share? Then please feel free to add your links and suggestions in the comments section. :) Thank you.
For military equipment and inspiration (Napoleonic wars, 1812, etc..) see some of these links below:

Tuesday, March 9, 2010

The 2010 Regency Bonnet Workshop


The ORS bonnet workshops are a popular and fun event. It's a casual, busy-hands event where many of us sit around for six hours just stitching, prattling away, laughing and drinking tea. Most people (those who work while talking, as opposed to talk while occasionally stitching) leave the workshop with a near-completed bonnet.

I offer instructions using my bonnet pattern for the stovepipe bonnet (you can get your own copy here), and also I provide instruction and assistance with the simple Regency soft-poke bonnet. This year, I've secured a lovely classroom upstairs at the Sandy Historical Museum. It's a nice space with a little kitchenette and a museum downstairs so there is a nice distraction when you're up and about stretching your legs.

For those of you who cannot attend the ORS bonnet workshops, here is the next best thing (and they're not so great, my apologies for quality... ::teehee::).

I have movie-tutorials on how to make a soft-poke bonnet, and how to assemble my pattern. I also noticed that my materials-list URL is outdated, so I have provided links to the updated materials lists below. I hope this helps you with your Bonnet project. Maybe someday you can join us at our yearly workshop.

The Tutorial for a Soft-Poke Bonnet:


The Tutorials (Parts 1 and 2) for assembling my pattern for the Stovepipe Bonnet:


Materials list for the Stovepipe Bonnet.
Materials list for the Soft Poke Bonnet.


Some inspiration:
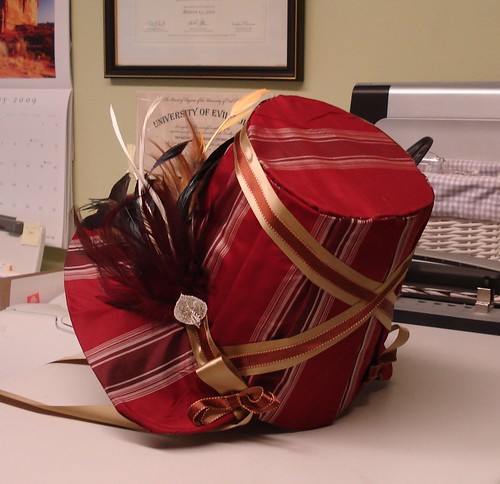
My Stovepipe Bonnet
Made for myself, and then given to a dear friend who adored it.
It is the high-angle short bonnet from my pattern.
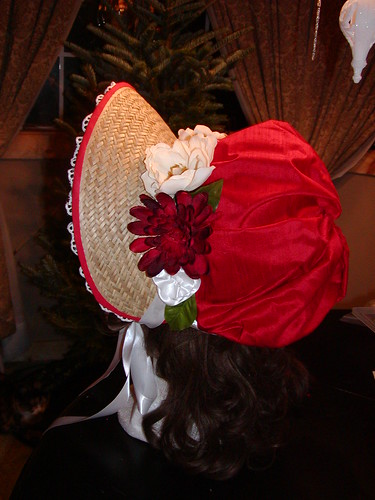
Red bonnet, etsy commission
An Etsy Commission.

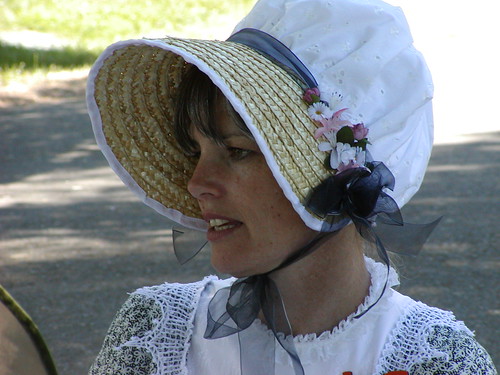
Sherry
This is my friend and coworker Sherry; I made this bonnet for her to wear
while she offers free tours of Pittock Mansion.

Katie's lovely bonnet
This bonnet was made by the ORS member Katie (she's modeling it).
This was during last year's February Bonnet Workshop.

Laura's bonnet
ORS Member Laura also made this during the same workshop.
Both she and Katie chose the low-angled long stovepipe bonnet from my pattern.
(Click here for a link to the whole set of photos I've collected of commissioned or personal bonnets)

Caps and Coifs

Regency caps were often worn underneath bonnets.

Here is a link to a variety of Regency Cap patterns as well as elaborate coifs.
http://www.neheleniapatterns.com/english/caps.html

Thursday, March 4, 2010

The Regency Lady's Turban

Turbans are wonderful things. They are good for day wear and evening wear, they allow for a variety of hairstyles, and your options for decoration and embellishment are endless. Turbans are the salvation for short-haired ladies, who need only style and curl the hair around their face (comb forward like a man’s hair, or curl into ringlets) and then add your turban to cover the back. It is also a very elegant, patrician sort of look.

I recommend that you use silk or silk-like fabrics for your turban. Try to stick to natural, not-too-shiny or slinky synthetic fabrics (that should be a rule of thumb with pretty much ALL historic costume creation; synthetics may look pretty at the store, but once their sewn, they kind of get ugly; especially when photographed). Anyway, I digress…

I have put together a little set of basic instructions on how to create a turban in three general styles; and using these construction methods, your options are limitless. I’ve given each style its own moniker (these are not official, these are my own titles).

1. The wrapped turban.

2. There is the cap turban (it’s more of a soft hat than a turban).

3. There is the rope turban (which is a form of the wrapped turban).

Creating each one of these individually requires some different approaches.


1. The wrapped turban.


One can easily wrap a turban on the head each time you want to wear it, and when you take it off, it will unravel into the long rectangle of fabric each time. I have an example of a wrapped turban below where the tail of the turban falls from the knot. It’s a simple design that can be used with a nice long rectangle of fabric. It’s a turban that would work nicely with a casual day dress or walking dress, and would be very nice if the ends of the turban are embellished with a fringe or teeny tassels. The one pictured above is a single wide wrap, but you can go with a longer, narrower piece of fabric and wrap it around multiple times while occasionally twisting the fabric, and then knotting or tucking if need be.

(Update: 11/2011) Miss Lauren Reeser aka 'The American Duchess' has provided a wonderful video on how to do a simple wrapped turban using a scarf or any kind of fabric.  You can view the video here:


In order to create a wrapped turban that doesn’t require constant rebuilding, you can wrap one and then fix it in place. Carefully wrap your turban around a head form, arranging and ruching (bunching) the fabric to your linking. As you go along, tack-stitch it in place—creating a hat shape as you go. That way you can just put it on and take it off with little worry of it unraveling on you. A great advantage of doing it as a stitched, permanent headpiece is that you can add tassels, lace in strings of beads, ribbons and whatnot as you stitch it down, to give it interest and dimension. It’s the simplest of projects, and it makes for a very attractive turban. You can also add a medallion with either game-bird feathers arcing across the front for a day-wear turban, or you can add a big froofy ostrich feather across the front, side or coming up from the back for evening. See the links provided below for fashion-plate examples from that time period.


2. The cap turban (also known as a capote or beret).


This turban is a sewed fabric hat, however the mushroomed fabric makes it very turban like and it also has the same versatility as day and evening wear depending on embellishments and fabric choices.

You start with a large circle. As with most first-time sewing projects, I recommend you create some cheap muslin mock-ups that when successful, can have the baste-stitches removed and used as a pattern later. Joanne Fabrics pretty much always has very cheap muslin ($2 - $3 a yard)… it’s good to always have some on hand for projects like these.

(click image to enlarge)
The diameter of your circle depends on how ‘fluffy’ you want your capote… I’d say, and this is just a wild guess, start with 20”. You can always trim the bottom edge down once you’ve done your gathering if it’s too poofy.

Sew a wide baste stitch all around the edge, and then when you’ve sewn the circuit, clip your thread, and start again slightly above the first set of stitches. Try and match the stitches below, and go around again parallel to the first set of stitches. Then you will gently pull your threads on one side and gather up your edges of the circle. You can then affix the gather once you get that desired circumference with a nice tight stitch all around the edge with your sewing machine (or by hand if you’re a purist).

You will then create a band. Cut it twice as wide as your desired width, and then fold, sew the long edge closed, turn inside out, and iron flat. You now have an inner surface to which you can stitch your capote without revealing the stitches on the facing side.

There you have it. The addition of tassels, feathers and medallions, whatever you like will make it work very nicely.


3. The rope turban
(click image to enlarge)

This turban can stand alone, or serve as an enhancement for the above turbans. The premise is to take two (or even three) fabrics, or perhaps fabric and a string of beads or ribbon, and to twist-fold them into a rope (or plait them as well). You can create a circlet or open-topped turban so your updo can cascade out the top, or you can make one or two and sew it to a closed-top turban (as seen in my drawings below). It’s a simple style, you can either hide the ends by sewing them together, or let the long end drape down the back or the side onto the shoulder.

Making two or three of the ropes and stacking them on top of a capote is also a fine option, and don’t forget to use embellishments. Beads, tassels, ribbon, trim, medallions and feathers are all acceptable decorations for your Regency turban. I recommend you check out the links provided below. You will see for yourself how elaborate these turbans can seem but really how simple they are to make. Let the images inspire your own project. Happy turban-making!


Sometimes a loose, narrow, long bandeau with beads wrapped around it also works very nicely for evening wear... it's sort of a turban, so I thought I'd throw this drawing in. :)
Some inspiration: